
No matter how much patience you might have, it’s guaranteed to lose if you notice one specific section of your strip isn’t working. If you’re looking for a step-by-step guide on how to fix your LED light strip, this article is for you.
Simply stating, “To fix your LED light strip, you’ll have to locate which section of the LED light isn’t working properly. Then, you’ll have to cut out that portion from the strip with a pair of scissors. Finally, you’ll have to connect the cut ends & your LED light strip will be fixed”
If you’re interested in knowing these fixation steps in-depth, continue reading this article.
Quick Guide: How to Repairing Your LED Strip
- To identify a damaged section of the LED strip, test each color (red, green, blue, and white) one by one using the remote control.
- Disconnect the LED light strip from the power supply before cutting out the damaged or broken section to avoid short circuits.
- Use scissors to cut the damaged section out of the LED light strip, making sure to cut right on the scissors icon in the middle of the copper connection.
- Connect the two ends of the strip using a soldering iron and soldering wire or connectors, aligning the R, G, B, and W letters together while soldering.
How To Fix Damaged LED Strip: Step By Step Guide
In this segment, I’ll show you how you can fix your damaged LED strip step-by-step. Follow the steps below to fix your LED light.
Things you’ll need:
- A Pair of Scissors
- Soldering iron & Soldering Wire
- Connectors
- Heat Gun & Heat Shrink Tube (Optional)
After getting the things you need, proceed to these steps:
Table of Contents
- 1. Inspect & Locate The Damaged/Broken Section Of the LED Strip
- 2. Safety First: Disconnect The LED light Strip From The Power Supply
- 3. Cut Out The Damaged or Broken Section
- 4. Connect The Two Ends of The Strip
- 5. Inspect Your Repaired LED Light Strip Again
- 1. Physical Damage
- 2. Age Issue
- 3. Water Damage
- 4. Voltage Fluctuations
- 5. Loose Connection
- 6. Cheap Quality Product
- LED Strip Maintenance Tips For Avoiding Future Damages
- Conclusion
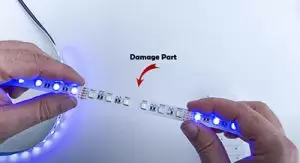
1. Inspect & Locate The Damaged/Broken Section Of the LED Strip
Here’s how you can check: First, plug your LED light strip into the power supply. Take your remote and change the primary three or four colors (red, green, blue, and white) one by one.
You’ve to make sure that each of the colors is being illuminated throughout the strip while testing. For example, if you’re checking the Red color – you’ve to check if the whole strip is showing red. Do the same thing with green, blue & white colors.
If one or several colors aren’t working in a section, it’s the damaged section.
2. Safety First: Disconnect The LED light Strip From The Power Supply
After identifying the damaged section, disconnect the LED light strip from the power supply. Disconnecting LED light strips while you’re working on them keeps both you & your strip safe from short circuits.
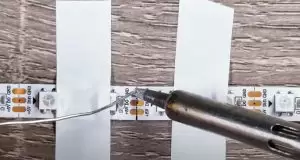
3. Cut Out The Damaged or Broken Section
It’s time to cut out the damaged or broken section from the LED light strip. It’s the most important task of fixing a broken LED light strip & you’ve to do it very carefully. Take scissors & cut right on the scissors icon in the middle of the copper connection.
4. Connect The Two Ends of The Strip
After taking out the damaged portion/section, you’re left with two parts of the same LED light strip. Now you’ve to connect the two ends using a soldering iron & soldering wire. Align them properly by matching the R, G, B, and W letters together before you solder them.
If you don’t want to use a soldering iron, you can use connectors alternatively. Connect both strips’ ends to the connector matching the (+ve) & (+ve) strip & connector. That’s how you can easily connect the two ends of the strip.
Pro Tips: You can use a heat gun and shrink tubes in the connector areas for enhanced safety.
5. Inspect Your Repaired LED Light Strip Again
Following the four steps mentioned above, your LED light strip should function just fine. However, if you notice it’s not working as it should, there could be several causes, including – an incompatible power supply & loose connection.
Fix those problems & reconnect your LED light strip again to the power supply. If you still find your LED strip isn’t working, you’ll have to bring a replacement of your LED light strips.
You can also watch this video:
6 Most Common Causes of LED Strip Failure
Numerous common & unique causes can damage a LED light strip. Here, I will talk about the six most common causes of LED strip failure.
1. Physical Damage
LED light strips are fragile by nature & they demand handling with care. If you’re not careful enough while handling your LED light strip, you will easily damage them.
The most common physical damages are bending & twisting of the LED strip. You can even damage your LED light strip while cutting them if you are not careful enough & cut them in the wrong place.
2. Age Issue
Unlike an incandescent bulb, an LED strip doesn’t fuse – it just gets dimmer and dimmer. If you’ve been using your LED light strips for years, it’s normal to see them not working as expected due to their limited lifespan.
Another issue with age is wear and tear on the soldered connection. All of these age-related issues can cause a LED light strip to fail.
3. Water Damage
If your LED strips aren’t waterproof, then water can damage your strips by infecting the circuit board – causing them to malfunction. Waterproof LED light strip protects its circuit board with silicone coating & that’s why they don’t get damaged due to water.
4. Voltage Fluctuations
Voltage fluctuations can cause damage to your LED light strips. This problem can happen due to various causes, such as – power outages, brownouts, or problems with the electrical grid. When the voltage is too high, the LED light strip gets overheated.
On the other hand, if the voltage is too low, the LED light strip flickers & it’s also a very damaging act for the LED light strip.
5. Loose Connection
The soldered connection between LED light strip sections can become loose over time. You can check whether or not the connection is loose by twisting-untwisting two sections & see if that results in lighting up the faulty strip section. If it blinks the LEDs, your strip has encountered a loose connection issue.
6. Cheap Quality Product
Never fall into the trap of extremely low-priced products (LED light strips), thinking you’re getting a good deal. If the product is cheap, your experience will be cheap as well. Basically, you will be getting poor-quality components & they will cause premature or unexpected failure while used.
LED Strip Maintenance Tips For Avoiding Future Damages
Though you can’t undo the damages that already happened to your LED strip, you can surely avoid future damages by keeping some maintenance tips in mind. Here are they:
1. Use a Compatible Power Supply
If your power supply can’t produce sufficient wattage & voltage according to your LED strips’ needs, you’ll encounter strip damage sooner or later. That’s why it’s important to use a compatible power supply for your LED light strips.
2. Keep LED Strips Cool
LED light strips require proper care to function properly. One important aspect of this care is ensuring that the strips are kept cool. If the strips are not in a cool and ventilated environment, they can become warm to the touch.
This can also damage the strips and reduce their lifespan. To prevent this from happening, make sure to properly cool and ventilate the area where the LED strips are located. It’s especially needed if they will be in use for extended periods of time.
3. Keep Distance Between Water & Strip
If your LED light strips aren’t waterproof, keep them away from water. Don’t keep them in places like washroom mirrors where there is a high chance of water splashes. Consider buying waterproof LED light strips if you want to use them like these places.
4. Avoid Voltage Fluctuations
You can avoid high or low-voltage issues just by installing surge protectors or voltage regulators. This thing will limit how much voltage should go inside the LED light strips & avoid strip issues like overheating or flickering.
5. Handle With Care
As I previously mentioned, LED light strips are naturally fragile. You should always handle them with care if you intend for years-long usage. Follow the best practices while installing & maintaining them to avoid physical damage.
For example, don’t bend your LED strip for corner areas and use connectors instead. If you’re planning on using glue to attach your LED light strips, then you’ve to do it very carefully. Apply the glue in a way that it doesn’t get into the copper connection through the 3M tape.
6. Buy Quality Products
Whether you’re buying LED light strips for your TV, reading room or gaming room – always try to buy quality products. These products might cost you much, but you’ll face lesser to zero hassle using them in the long run.
7. Regular Checkups
Different types of problems can occur in a LED light strip. That’s why you should check your LED light strips regularly to see if all colors are functioning well if the LEDs are blinking or flickering do the diagnostics quickly.
8. Use a Dimmer Switch
If you’re using your LED light strips in areas where it’s necessary to adjust them from time to time, use a dimmer switch instead of turning them on & off frequently. If you use the on/off switch less, you can surely prolong your LED light strip’s life span.
Conclusion
I hope this article was helpful enough to give insightful information on fixing LED light strips. I’ve mentioned how you can repair your broken or damaged LED light strips without expertise.
Also, I’ve shown several common causes that could potentially cause your LED light strip to break or damage.
The fixation method mentioned above might not work in some cases. In those cases, you’ll need to purchase new strips again.
I am Mark Braeden, a professional electrician based in California. With over a decade of experience in the electrical industry, I have launched this website with the aim of sharing my expertise and providing solutions to common lighting issues that can cause frustration for homeowners.
Whether you need help selecting the right bulb for your living room lamp or require guidance in installing LED strip lights, I am here to assist you.
But it’s not just about fixing problems. I’m also here to inspire you with all sorts of creative lighting ideas that can transform your home.
")

")
")
")