
You can connect LED light strips together with connectors or by soldering. There are many types of connectors available in the market & you can use them for connecting your LED light strips. If you don’t want to use connectors & have decent electrical knowledge – you can try using a soldering iron to connect your LED light strips.
If you’re here to learn how to connect LED light strips, I warmly welcome you to read this entire post. In this article, I’ll be mentioning the ways of connecting LED light strips in a step-by-step manner.
Without further ado, let’s get started with this article.
How To Connect LED Light Strips With Connector: Step By Step Guide
You’ve done half the job by properly cutting your LED light strips. Now, it’s time to connect them and the easiest (also safest) way of connecting LED light is using connectors. You don’t need prior technical or electrical knowledge to connect your LED light strips with connectors.
Please keep in mind there are many types of connectors available in the market & each of them serves/solves different problems. I’ll discuss them(about connectors) shortly, so you know which suits your need.
Before that, let’s dive deeper into the pin configuration of LED light strips & what they actually mean.
Table of Contents
- Understanding The Pin Configuration of LED Light Strips
- Types Of Connectors For Connecting LED Light Strips
- Process Of Connecting LED Light Strip Using Connector In No Time
- Process Of Soldering LED Light Strips Together
- Method 1: Wire-Free Solution: Solder LED Light Strips Together
- Method 2: Solder Strip Light Together Using Wire
- Frequently Asked Questions – FAQs
Understanding The Pin Configuration of LED Light Strips
It’s important to know about the pin configuration of LED light strips. There are four variations of LED light strips with four types of pin configurations. These are:
- White LED Strip
- RGB LED Strip
- RGBW LED Strip
- RGBWW LED Strip
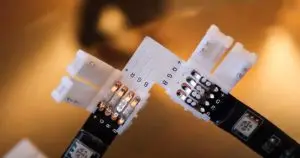
You’ll find most of the White LED Strip’s width is about 8mm & they come with 2 pins. RGB (Red Green Blue) LED light strip comes with 3 pin (also called ARGB) & 4 pins & their width varies from brand to brand; basically, it’s from 8mm to 12mm. Same width with RGBW (Red, Green, Blue, White) with 5 Pin. Again, you’ll get 8mm to 12mm width strips with RGBWW (Red, Green, Blue, White & Warm White) strips that come with 6 pin.
Types Of Connectors For Connecting LED Light Strips
There is nothing such as a one-size-fits-all when it comes to connectors for connecting LED light strips. Here are the different types of connectors for connecting LED light strips:
Standard Connector
Standard connector is also known as gapless connectors for their wire-less characteristics. There are two other types of gapless connectors: L-Shape Connector and T-Shape Connector.
If you want to connect two LED light strips at a 0-degree angle & don’t want any gap between them, use a standard connector.
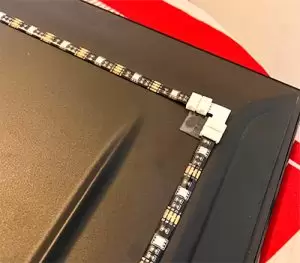
L Shape Connector
If you want to connect two LED light strips at a 90-degree angle without any gap, use an L-shape connector. These types of connectors are best for use behind the TV, on the floor – basically in locations with corners.
T Shape Connector
If you want to connect multiple LED light strips from three different directions without any gap or wire, use a T-Shape connector (Amazon).
Jumper Cord Connector
Jumper Cord Connector (Amazon) is used for strip-to-strip connection & it’s a wire solution for connecting LED light strips. It comes with wires, so the wire portion won’t be illuminated as you connect two strips.
This type of connector is best to use on the ceiling as there is too little space for using any other connector types. Also, you can use it in the cabinet or any place where you want to extend strips without illuminating the entire pathway.
LED Strip-To-Wire Quick Connector
This type of connector (Amazon) is almost identical to Jumper Cord Connector but has only one clip on the side instead of the two like the Jumper Connector. That means you’ll have one exposed part connected to the power supply adapter or power supply unit (PSU).
So, you can use this Strip-To-Wire quick connector if you’re trying to connect your LED light strips to a power source.
Process Of Connecting LED Light Strip Using Connector In No Time
Now that you know which connector is suitable for you, it’s time to connect the LED light strip using that connector. Follow the steps below to perform the connecting task correctly:
- Get the suitable connectors & make sure you’ve plenty of them.
- Now unfold the connector so that you can insert the LED light strip. Remember, these connectors are tightly attached, and you might need to use a paper clip’s metal part to unfold them properly.
- Peel off the adhesive part of your LED light strip before inserting it into the connector. If it’s a waterproof LED strip, peel off the silicone coating first with a cutter.
- Now insert the LED light strip into the connector. Make sure to match the (+ve) & (+ve) parts of the connector & led light strip correctly.

By following the five steps mentioned above, you can easily connect your LED light strips using connectors.
How To Solder LED Light Strips Together: Step By Step Guide
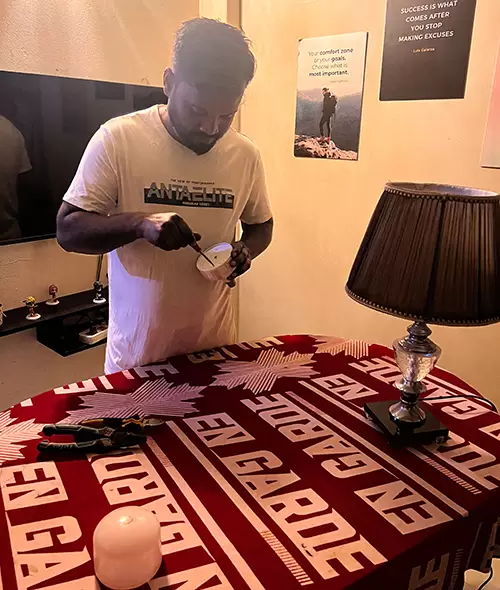
If you don’t want to use any connectors to connect your strips, you can solder them together. There are mainly two ways of connecting LED strips by soldering & I’ll explain them in the next segment. Before that, know what you’ll need to solder LED light strips together:
Things You’ll Need:
- Soldering Iron (Amazon)
- Wire Solder (Amazon)
- Coloured Silicone Wires (Amazon)
- Heat Shrink Tubing (Amazon)
Process Of Soldering LED Light Strips Together
As I mentioned earlier, there are two methods of soldering LED light strips & they are – 1) Direct Strip-To-Strip Connection and 2) Soldering By Using Wire. Stay tuned for step-by-step guides on both of these methods.
Method 1: Wire-Free Solution: Solder LED Light Strips Together
Follow these steps below to solder LED light strips together without any wires:
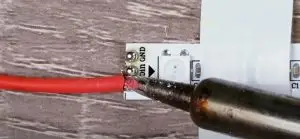
- Peel off the plastic & silicone coating covering the copper connection of your LED light strips. You’ll get silicone coating if the strip is waterproof.
- Now place both of the LED light strips on the table or floor & align them face-to-face. Make sure both strips face upwards, matching the positive & negative sides together.
- Stick them to the table or floor with costape. Doing this, you’ll keep yourself & the LED light strip from getting hurt/damaged.
- Heat up the soldering iron for soldering.
- Take the soldering wire & melt it using the soldering iron on the joint of two LED light strips.

- Optional: Use a heat shrink tubes for secure use.
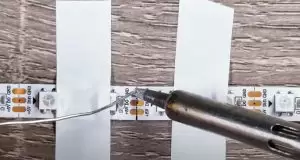
That’s it; you’ve successfully soldered two LED light strips together without any wire.
Method 2: Solder Strip Light Together Using Wire
If you’re trying to carry your LED light strips to a distant place while it’s attached to another LED strip, you’ll need to use wires to connect them.
Note: The length of the wire will indeed affect the lighting quality. If the wire is too lengthy, the voltage will drop significantly if it’s not supported by a proper power supply unit (PSU).
Follow these steps below to solder strip light together using wire:
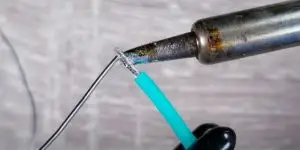
- You’ll notice the copper connection is covered by either plastic or silicone coating. Peel off these coatings & expose the copper connection first.
- Each pin requires a separate wire connection. For context, you’ll need 5 wires for 5 Pin RGBW & 6 wires for 6 Pin RGBWW. The same is true for 4 Pin RGB & 2 Pin White LED Light Strips.
- Now take the proper amount of coloured wires based on your strip’s type.
- Expose both ends of the wires using an electrician’s scissors or wire stripper (Amazon).
- Do a quick tinning to the ends of the wires. It will help the wire to stick better to your LED light strip.

- Before starting the soldering process with coloured wires, solder the copper connections of your LED light strips first.
- After that, take the solder wire & coloured wire. Now, melt the solder wire on the colored wire placing it on the LED light strip’s copper connection. Make sure to place the wire in the correct location.

- Repeat steps 6 to 8 with the other LED light strip. Make sure to match the colours with both of the LED light strips.
- Optional: Use a heat shrink tubes for secure use.
That’s it; you’ve successfully connected LED light strips together via soldering with wires.
Read Also:
How to connect multiple light strip in one power source
17 Awesome Location In Room Where You Can Put Led Light Strip
Frequently Asked Questions – FAQs
Can I Connect Different Brands of LED Light Strips Together
Yes, you can connect different brands of LED light strips together if their voltage & width is the same. Check the wattage per meter as well before connecting the strips. You’ll be all good if everything matches; otherwise, you’ll damage both LED light strips.
Why Is My Extended LED Light Strip Failing To Showing Some Colors?
If one or multiple pins of LED light strips become faulty, it fails to show some colours. For example, RGB light consists of 4 Pin including Red, Green & Blue pins. If the Blue pin becomes faulty, the strip can’t produce colours that require Blue colour.
How Can I Connect Two LED Strips Over a Distance of 10+ Feet?
If you’re in a situation where you need to connect two LED light strips over a distance of 10+ feet, you can use LED strip connectors. The use cases of this situation are many; for example – you might be decorating your kitchen & noticed your connected strips need to run over the stove or sink while connecting two cabinets. That time you need to use a connector that comes with a wire connection (Amazon).
However, if you don’t want to use the connector then you can use the wire soldering method. Via this method, you can choose the length of the wire according to your need. I’ve mentioned how you can connect LED light strips using the wires above, do check that out.
Conclusion
I hope this article helped solve your problems with connecting LED light strips. I’ve explained every possible way of connecting LED light strips together & it’s up to you which method you follow.
If you ask me, I suggest using connectors if you don’t have any prior electrical knowledge. If you have decent knowledge regarding electrical stuff & know how to use a soldering iron, you can use connectors or soldering iron to connect LED light strips.
I am Mark Braeden, a professional electrician based in California. With over a decade of experience in the electrical industry, I have launched this website with the aim of sharing my expertise and providing solutions to common lighting issues that can cause frustration for homeowners.
Whether you need help selecting the right bulb for your living room lamp or require guidance in installing LED strip lights, I am here to assist you.
But it’s not just about fixing problems. I’m also here to inspire you with all sorts of creative lighting ideas that can transform your home.
")
")
")
")
")