
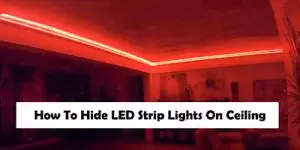
Though I am a great fan of LED light strips, sometimes the ceiling strips become intolerable. The best solution I could have was to hide them under something. If you’re facing problems like me & thinking about how to hide LED strip lights on the ceiling – this article is for you.
You can hide LED strips on the ceiling by doing various things such as installing crown molding, false ceiling, or cloud ceiling. Apart from these heavy installations, you can also install lightweight LED strip diffusers to hide LED strip lights on the ceiling.
If you are interested in the detailed procedures follow this article. I will be discussing the steps clearly as possible so you can hide your LED strips without hassle.
How To Hide LED Strip Lights On Ceiling: Top 4 Methods
Table of Contents
1. Use Crown Moulding: Stylish & Reliable
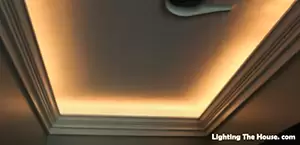
Installing crown molding is one of the most ideal solutions for hiding LED strips on the ceiling. This work can be tricky if you’re inexperienced with electrical & cutting/sawing. Still, follow the steps mentioned below & hopefully you’ll be able to install the crown mold successfully.
Pro Tips: Though there are many brands manufacturing crown molding, I recommend getting Orac Decor, 6 Foot White (Amazon) option for your room. As Orac Decor has a great market reputation, you can trust them.
Things You’ll Need:
- Measurement Tape
- Table Saw & Coping Saw
- Adhesive
- Backer Strip
- Crown Moulding
- Nail Gun
- LED Lights, Dimmer & Outlet
Step 1: Measure The Circumference Of The Room For The Installation
You will need to measure the circumference to determine how much molding, backer strip & LED Strips you’ll need. Don’t forget to keep 15% more molding and backer strips for cutting & waste purposes.
Step 2: Install Power Outlet & Dimmer Switch
You’ll need to run wire through the overhead light or ceiling fan. Make sure to install the power outlet correctly by hooking the hot and neutral wires to the appropriate terminals.
After installing the outline, install a dimmer switch beside your normal outlet. This dimmer will help you get the right mood by adjusting the color temperature of your LED lights.
Step 3: Determine The Correct Position For Crown Molding and Backer Strip
If you don’t want to mess up the situation, determine the correct position for crown molding and backer strips before cutting them for your room. Generally, you’ll need a gap of 6 to 8 inches above the ceiling while installing them.
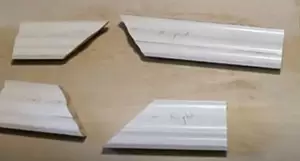
Step 4: Cut Crown Molding & Backer Strip In The Right Measurement
Use the measurement you got from measuring the circumference of the room & use that to cut crown molding & backer strip. Remember, your backer strip will be a few inches smaller than the crown mold.
Use a table saw to cut your crown mold & backer strip. Typically you will need to cut your molding and backer strip at 42 or 45 degrees. Later on, you might also need to use a coping saw to get a perfect angle.
Step 5: Install Backer Strip and Crown Moulding
After cutting in the appropriate size, install the backer strip on the side wall with nails using a nail gun. Keep a few inches of gap between the backer strip and the corner.
Later on, install the crown molding by nailing it to the backer strip. This time you don’t have to keep a gap between the molding and the room corner. You’ll need to do some extra work cutting the crown molding for room corners like the picture below:
To wrap up everything, use adhesive to fill some unexpected gaps between the mold joints.
Step 6: Run LED Light Strip & Electrical Connection
Before installing the LED light strips, increase your LED strip length to the correct measurement. However, don’t exceed the limit mentioned in your LED strip box/manual.
Finally, run LED light strip above the crown molding using the adhesive it came it. Install other electrical connections needed to light up the LED strip lights.
2. LED Strip Diffuser Channel: Easy & Cheap
You can avoid getting annoyed by the direct LED strip light by installing LED strip diffuser channels. Assuming you’ll be using aluminum channels, If you don’t have a diffuser channel then you can look Muzata Aluminum LED Channel (Amazon).
For instaliation follow these steps to get your work done:
- Step 1: Attach the LED light strip to the aluminum channel using the pre-installed adhesive.
- Step 2: Take the Opal Diffuser Cover & apply mild pressure until it clicks in the right position.
- Step 3: Finish everything off by securing caps on each end of the channel, ensuring the tails go through the end cap hole.
- Step 4: Add some mounting clips so that you can install these channels in the correct place.
- Step 5: Drill holes in your wall so that you can install all the aluminum channels correctly.
- Step 6: Place all the LED strip diffuser channels in the correct places & you’re all set.
3. Install Cloud Ceiling: DIY Solution & Fun Way
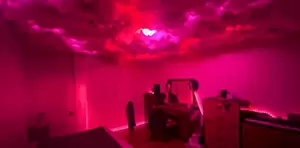
Installing a cloud ceiling is a very fun way of hiding LED strip lights on the ceiling. Here is how you can install a cloud ceiling:
- Step 1: Attach the LED strip lights on the ceiling with double-sided tape. You can also use the pre-installed adhesive if it’s strong enough.
- Step 2: Buy a polyester fiber box from Amazon or the offline market. Here is a link to the product – Poly-Fil Premium Fiber, White (Amazon).
- Step 3: Use glue to attach the fibers to the wall. Make them fluffy enough so that they look like clouds & covering the LED light strips.
- Step 4: Do a final check & then light up the LED light strips.
4. Install False Ceiling: Expert Assistance Needed
Dropped ceiling or false ceiling helps you hide your LED strip lights on the ceiling. However, this work won’t be a DIY (Do It Yourself) for most people out there as it requires great labor work with a lot of materials that people don’t use daily.
To install a false ceiling or dropped ceiling, call your nearby home decoration shop & ask for their assistance decorating your room.
Things To Consider While Hiding LED Strip Lights On Ceiling
Hiding the LED strip lights on the ceiling is a great way of enhancing the beauty of your room. However, there are a few things to consider while hiding LED strips on the ceiling. Here are them:
- Installing crown or cove molding & false ceilings can be very expensive for some users.
- Doing such operations can leave permanent marks on your walls while removing them.
- Changing LED strips frequently will become very hard.
- Requires electrical knowledge to do some of the tasks mentioned above safely.
- Cutting & sawing needs prior experience to get started.
If you’re on a budget, consider getting LED light diffuser or installing cloud ceilings.
Conclusion
I hope this article was helpful enough to give solutions to hiding LED strip lights on the ceiling. I have discussed the top 4 ways of doing it in depth. However, if you feel uncomfortable getting your hands down doing the work mentioned – you can call the experts for help.
Don’t do the electrical stuff if you’re not experienced enough. Let the experts handle the stuff you’re not good at/comfortable with. Still, you can do some of the methods mentioned above, such as – installing LED light diffusers or cloud ceilings on your own without any issue.

I am Mark Braeden, a professional electrician based in California. With over a decade of experience in the electrical industry, I have launched this website with the aim of sharing my expertise and providing solutions to common lighting issues that can cause frustration for homeowners.
Whether you need help selecting the right bulb for your living room lamp or require guidance in installing LED strip lights, I am here to assist you.
But it’s not just about fixing problems. I’m also here to inspire you with all sorts of creative lighting ideas that can transform your home.
")
")
")
")
