
LED strip lighting is an affordable way of enhancing the beauty of one’s room. However, installing LED strips on the ceiling is slightly more complicated than in any other place for various reasons.
With the proper guide on how to install LED lights on the ceiling, anybody can install them without having any major issues. This article will exactly deliver the guide you’re looking for & it’s organized in a easy-to-follow way.
I’ve divided this article into two segments: 1) Pre-installation Process & 2) Installation Process. With these two segments, you’ll be guided from A to Z to set up your ceiling LED strip. Without further ado, let’s get started:
Table of Contents
- Pre-Installation Process: 4 Things You Must Do/Check
- 1. Finding the Perfect Spot
- 2. Attaching LED Strip Lights on Your Wall
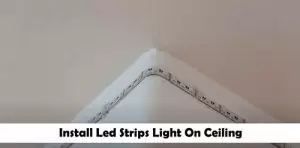
- 3. Install Led Strip Lights On Ceiling Corners
- 4. Time To Hide Led Strip Light On Ceiling
- 5. Use One Power Source For Multiple Led Light
- 6. Connect Led Light To the Power Adapter
- 7. Check Everything Works Fine
- 8. Now Clean The Surface
Pre-Installation Process: 4 Things You Must Do/Check
Here are the three things you should keep in mind to check & do before starting the installation process:
1. List Of Necessary Tools & Supplies
You’ll need several things before installing the LED light strip on your ceiling. Here are they:
- LED Light Strip
- Connectors: For connecting two LED light strips.
- Soldering Iron: For attaching two LED light Strips.
- Mounting Clips: For arranging LED strips correctly.
- Double-Sided Tape: For holding the LED light controller attached to the wall.
- LED Diffuser or Crown Molding: For hiding LED light strips on the ceiling.
- Scissors: For cutting the LED light strip.
- Power Supply.
- Dimmer: Optional, but it will help in controlling the brightness of the LED light strips.
Ensure you’ve access to the materials mentioned above before installing the LED light strips.
2. Choose The Right LED Strip Lights & Power Supply
You can’t just purchase random LED light strips (of voltage, or length) and call it a day. To make sure you’re getting the right LED light strip for your room, check these three facts before making the purchase:
Measure Your Room & Choose LED Strip Length
To choose the right length of LED strips for your room, you need to measure the length of each wall in feet. These measurements will help you determine how many strips you need to cover the room.
To calculate the number of LED strip packages you need, use the following formula:
Step 1: Let a, b, c, d, and e represent the following measurements:
- a = 1st wall length (in ft.)
- b = 2nd wall length (in ft.)
- c = 3rd wall length (in ft.)
- d = 4th wall length (in ft.)
- e = LED Strip Length Per Package (in ft.)
Step 2: Final equation:
The equation to determine the number of LED strip packages needed is (a+b+c+d)/e. If you want to know the total length of the LED strips, it is (a+b+c+d) ft.
For example, if each LED strip package contains 32 feet of LED strips, and the total length of your four walls (a+b+c+d) is 60 feet, you will need approximately 2 packages (60/32 = 1.9 ~ 2).
By following these steps, you can measure your room and choose the correct length of LED strips for your project.
Read Also: How to Cut Led Light Strip
3. Consider Getting Dimmable LED Strips
If you want to control the brightness of your LED strip lights, you will need dimmable LED light strips. With these LED light strips, you can control the brightness with a dimmer.
4. Get The Correct Power Supply Adapter
This point is crucial if you’re buying LED light strips & the power supply adapter/s separately. You’ll find voltage options in LED light strips – 12V and 24V. No matter which voltage option you choose, ensure your power supply adapter can deliver the required voltage.
Note: Sometimes, you might need more than one power supply adapter if there are more than two end lines.
Installation Process: How To Install LED Light Strip On Ceiling
Follow these below-mentioned steps accurately to install your LED light strips on the ceiling without any issues:
1. Finding the Perfect Spot
To begin installing your LED light strips, it’s important to choose the best location to start from. One of the key factors to consider is the accessibility of the power supply.
Try to choose a starting place where the power supply is easily accessible. That way, you won’t have to deal with a tangled mess of wires later on. Ensure enough room under the cabinet or furniture to hide the power supply adapter.
2. Attaching LED Strip Lights on Your Wall
It’s time to attach the LED light strips to the wall. Simply peel off the adhesive cover & start hanging the strips on the wall 6-8 inches below the ceiling.
But wait, hold on a sec. If your wall is textured, recently painted, or wet, using adhesive might turn into a sticky situation. The adhesive can damage the paint and the LED light strips may not stick properly either.
But don’t worry, we’ve got you covered. Consider using adhesive alternatives to install your LED strip lights on the ceiling, such as mounting clips, aluminum channels, or other options that won’t harm your wall.
3. Install Led Strip Lights On Ceiling Corners
It’s time for doing the corner side of your room. You might find it challenging to do this task. Don’t overthink; bend your LED light strips while covering the corners.
If you’re not comfortable bending the strip in fear of potential damages, use connectors (Amazon) instead. However, you’ll need to attach the connectors in the corners with additional double-sided tape as well.
4. Time To Hide Led Strip Light On Ceiling
LED light strips can be a great addition to any room, but they can also be a nuisance when you’re trying to sleep. Directly-facing LED light strips can disrupt your sleep cycle, making it harder to fall and stay asleep. That’s why it’s important to consider hiding your LED light strips.
You can hide the led strip by using crown molding, a false ceiling, or a diffuser. If you’re interested in learning more about how to hide your LED light strips on the ceiling, I have a whole article on the subject – be sure to check it out!
Alternatively, if you don’t want to hide your lights, you can still adjust their brightness by installing a dimmer switch. This way, you can enjoy the ambiance of your LED light strips without negatively impacting your sleep quality.
5. Use One Power Source For Multiple Led Light
You’ve already installed LED light strips on your four walls & they should look great. However, if you use multiple power adapters to light them up, they will eventually look messy & cluttered. Besides, you won’t be able to control whole room lighting at once if you use multiple power adapters.
To avoid a cluttered and messy look in your room after installing LED strip lighting, connect all the strips with one power source. For more detailed instructions on how to do this, check out my guide on connecting multiple led strip lights to one power source.
6. Connect Led Light To the Power Adapter
As you’ve already connected all the strips, leaving only two end lines – it’s time to attach them to the power adapter. Make sure to correctly connect the strips with the power adapter by matching the positive (+ve) and negative (-ve) parts.
Don’t forget to attach your power supply adapter to the wall with double-sided tape. Make sure you’re reaching the power outlet from the distance you’re sticking it to.
7. Check Everything Works Fine
After installing your LED strip lighting, it’s time to test it out. Turn on the power switch and use the remote to press the “ON” button. If the lights respond as expected, you successfully installed the LED strips. If not, you should check your connections and try again.
8. Now Clean The Surface
After the installation process is completed, you may have excess strips and wires lying here and there. Clean the excess wires, connectors & LED light strips properly. With this step – you’ve successfully installed LED light strip on the ceiling of your room.
Conclusion
I hope this article was helpful enough to instruct how to install LED strips on the ceiling. I’ve tried my best to explain all the steps in an easy way that anyone can understand. If you still have issues setting up your LED light strip, consider getting expert help.
I am Mark Braeden, a professional electrician based in California. With over a decade of experience in the electrical industry, I have launched this website with the aim of sharing my expertise and providing solutions to common lighting issues that can cause frustration for homeowners.
Whether you need help selecting the right bulb for your living room lamp or require guidance in installing LED strip lights, I am here to assist you.
But it’s not just about fixing problems. I’m also here to inspire you with all sorts of creative lighting ideas that can transform your home.

")
")
")
")